
Choosing the right printing method can be tricky, especially with so many options available.
So in this blog I’ve tried to compare two popular printing methods i.e. Pad Printing and Screen Printing.
Being the Owner of Color Craft Prints which specialized in providing printing services in Mumbai, I will share my understanding about both the methods.
And hopefully it will help you take the right decision.
What is Pad Printing?
Ever thought about how a logo or design is perfectly printed on a curved or uneven surface, like a golf ball, a phone case, or on the temple of your sunglasses.
That’s because of pad printing.
Pad printing is a unique printing technique that transfers a 2D image onto a 3D object.
It’s like stamping but with a lot more precision and flexibility.
Here’s a simpler way to think about it:
Imagine taking a soft, flexible stamp (called a “pad”) and pressing it onto an inked image.
Then, you transfer that image onto just about any shaped surface – flat, round, or irregular.
It started gaining popularity in the 1970s and has evolved significantly with advances in technology.
Pad printing is now a go-to choice for industries like electronics, automotive, promotional items, and even pharmaceuticals.
In my experience of providing Pad Printing Services, this method is incredibly useful for printing on more tricky surfaces where other printing techniques fall short.
- Flexibility: It works on anything from plastic and metal to glass and ceramics.
- Precision: Great for small or detailed designs and logos.
- Versatility: Perfect for printing on items that aren’t flat, like mugs, pens, toys etc.
How Pad Printing Works
The pad printing process involves several key components that work together to transfer an image or design onto a substrate.
Here’s the step-by-step breakdown:
Step 1 - Creating the Design Plate
The process starts with a metal plate that holds the design.
The design is etched into this plate, creating tiny grooves where the ink will sit.
Step 2 - Inking the Plate
The etched plate is coated with ink, but it’s not that straightforward.
A scraper, called a “doctor blade,” removes the excess ink from the plate’s surface, leaving ink only in the grooves of the design.
Step 3 - Transferring the Image to the Pad
Next, a soft, silicone pad (think of it like a squishy stamp) presses down onto the inked plate.
The pad picks up the ink from the grooves, holding the design on its surface.
Step 4 - Stamping the Design onto the Object
The pad is then carefully pressed onto the object you want to print on – whether it’s round, curved, or flat.
The flexibility of the pad allows it to wrap around the object, transferring the ink with high precision.
Step 5 - Curing the Ink
Finally, the ink is dried or cured (often with heat or UV light) to ensure it sticks to the surface and becomes durable.
What is Screen Printing?
Screen printing is a versatile and popular printing technique that’s been around for centuries.
It’s a method where ink is pushed through a mesh screen onto a surface beneath.
This technique is also known as silk screening or serigraphy.
Screen printing has a rich history dating back to ancient China during the Song Dynasty (960–1279 AD).
Initially, silk was used as the screen material, hence the term “silk screening.”
Over time, the process evolved and spread across Asia and Europe.
Today, screen printing technology has advanced significantly.
Modern screen printing uses synthetic mesh screens instead of silk.
It’s now a highly automated process in many commercial settings.
The beauty of screen printing lies in its vibrant colors and the ability to produce large volumes quickly.
It’s perfect for designs that need to pop, especially on things like t-shirts or tote bags.
How Screen Printing Works
So what exactly is the process to get a design printed using screen printing method
Let’s break it down:
Step 1 - Creating the Stencil
The process begins with creating a stencil of your design.
This is typically done using photosensitive emulsion.
You coat the screen with the emulsion and let it dry in a dark room.
Then, you place your design on the screen and expose it to light.
The light hardens the emulsion around your design.
After exposure, you wash away the unhardened emulsion, leaving your design as open mesh.
Step 2 - Positioning the Screen
Once your stencil is ready, you secure the screen in the printing press.
You align it carefully to ensure accurate placement of the design.
The screen is typically held in place by clamps or hinges.
Step 3 - Positioning the Screen
The screen is then positioned over the material you’re printing on – think fabric, paper, or even wood.
Everything has to be lined up perfectly, especially when multiple colors are involved.
Step 4 - Applying the Ink
You pour a line of ink across one end of the screen.
The amount of ink depends on the size of your design and the material.
Too little ink results in patchy prints, while too much can cause bleeding.
Step 5 - Print the design
Using the squeegee, you pull the ink across the screen with firm, even pressure.
This forces the ink through the open areas of the stencil onto the substrate.
The angle and pressure of the squeegee are crucial for a clean print.
You typically make one or two passes to ensure full ink coverage.
Step 6 - Drying the Ink
The final step is drying or curing the ink to ensure it adheres properly and won’t wash away or fade.
Depending on the ink, this could involve heat, air drying, or UV light.
Pad Printing Vs. Screen Printing
When it comes to pad printing and screen printing, both methods has their own advantages and limitations.
Let’s compare the both on various important aspects.
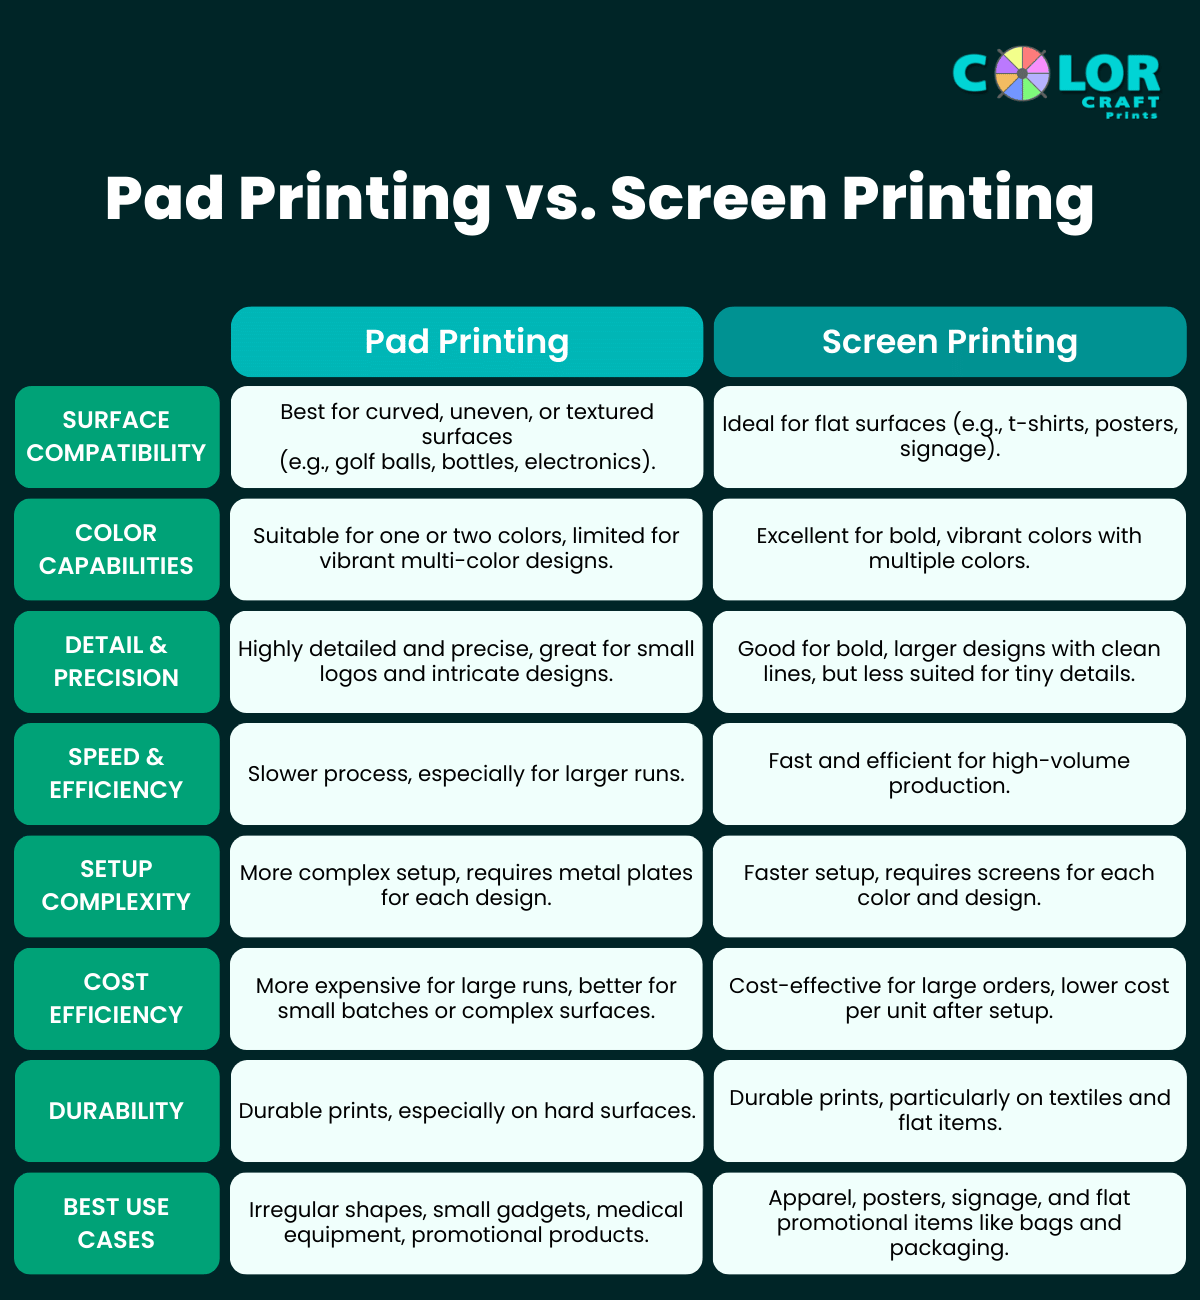
(Click on the image to enlarge)
1. Surface Compatibility
Pad Printing
Pad printing is ideal for printing on tricky surfaces.
Think round, curved, uneven, or textured surfaces.
It’s perfect for objects like golf balls, bottles, medical devices, and electronics.
If your product isn’t flat, pad printing is probably your best bet.
Screen Printing
Screen printing, on the other hand is ideal for flat surfaces.
It’s most commonly used for things like t-shirts, posters, signage, and flat packaging.
While you can screen print on some cylindrical objects, it’s not as flexible or precise as pad printing on irregular shapes.
2. Color Capabilities
Pad Printing
Pad printing can handle multi-color designs, but it’s often used for one or two colors due to the complexity of the setup.
It’s great for detailed, small designs, but when you need vibrant, full-color images, it might be limited.
Screen Printing
Screen printing shines when it comes to bold, vibrant colors.
You can layer multiple colors to create rich, eye-catching designs.
Think about those vibrant t-shirts with multiple colors – that’s screen printing at work.
3. Detail and Precision
Pad Printing
Pad printing excels in fine detail.
It can handle tiny logos, small text, and intricate designs with remarkable precision.
This makes it ideal for products like keypads, buttons, and other small, detailed items.
Screen Printing
Screen printing also delivers detail, but it’s better suited for bold designs with clean lines and larger elements.
It struggles a bit more with super intricate or small details.
4. Speed and Efficiency
Pad Printing
Pad printing is generally slower, especially for larger runs.
The process of inking the pad and transferring it to the object takes more time, especially when printing on complex surfaces.
But there are automatic pad printing machines that speeds up the work.
Screen Printing
Screen printing is built for speed, especially in high-volume jobs.
Once the screens are set up, the process moves quickly.
It’s ideal for large-scale production where speed is a key factor.
5. Setup Complexity
Pad Printing
Setting up pad printing involves creating metal plates for each design and preparing the pads, which can be a bit more involved.
It’s not ideal for quick, one-off projects because of this.
Screen Printing
Screen printing requires creating screens for each color and design, but once that’s done, it’s ready to go.
The setup is faster compared to pad printing, especially for large batches.
6. Cost Efficiency
Pad Printing
Pad printing tends to be more expensive for smaller runs because of the slower process and more complex setup.
It’s better suited for larger runs or when you need to print on surfaces that are otherwise difficult to handle.
Screen Printing
Screen printing is extremely cost-effective for large orders.
Once the screens are set up, the cost per unit drops significantly, making it a better option for bulk orders.
7. Durability of Prints
Pad Printing
Pad printing is known for its durable, long-lasting prints.
Once cured, the ink holds up well against wear and tear, especially on non-flat surfaces.
This makes it great for items that are handled frequently, like buttons or electronics.
Screen Printing
Screen printing also produces durable prints, particularly on textiles and flat items.
The ink used in screen printing is thick and sticks well to the surface, especially when heat-set.
7. Durability of Prints
Pad Printing
Perfect for items like medical equipment, promotional products, small gadgets, and anything with an irregular shape.
Screen Printing
Ideal for apparel, posters, signage, and products with flat surfaces like bags and packaging.
